You CAN Do It! – part I
Canning is by no means a new concept. In fact, it dates back to the early 1800’s when it was invented as a means of preserving foods by the French military. And apparently, the only items you can can with a boiling water bath are fruits and pickles because of their high acid/low pH- if you’ve got a pressure cooker, we’re talking a whole different kind of canning!
Today, the only people I know who can are my dad and my friend Kelly. My dad makes his own black berry jam every year with berries from the yard, and Kelly has been on a canning kick, making everything from pickled asparagus for bloody mary accoutrements to infused jams and jellies – and I think the fact that Kelly is 3 years younger than I am speaks to the revival of this traditional method.
With these folks as inspiration, I knew I had to take a stab at one of Bon Appetit’s recipes from their canning article in the August issue. As part of the local/organic/slow food/home cooked/foodie environment that we live in, canning seems to be winning back a place in pop culture. This issue also coincided perfectly with Kelly’s ‘canning extravaganza’ party in which 8 girls crammed into 1 San Francisco kitchen and cooked 4 preserved recipes over the course of 7 hours. I met everyone at the crack of dawn (really, only 9:30 am, but after my Friday night it may as well have been sunrise) at the Ferry Building Farmers Market where we picked up our goods to preserve and pickle the following recipes:
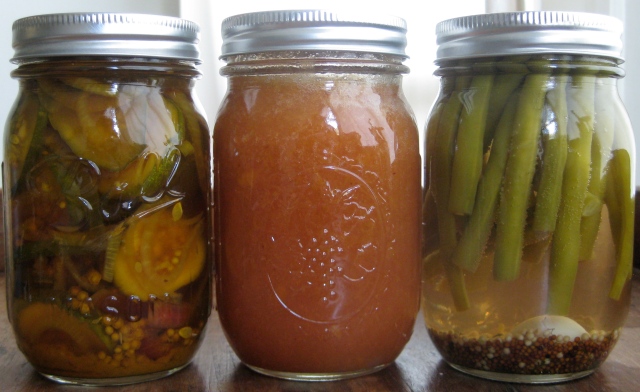
- Bread and Butter Pickles – from Bon Appetit, of course!
- Lavender Infused Peach Jam
- Dilly Beans – pickled green beans w/ dill
- Pepper Jelly (ended up not so jelly)
- Sterilize the jars and lids in boiling water. Note: the part of the lid with the seal can only ever be used once

- Cook your recipe per the instructions

- When you’re ready to can, pull out the jars, fill with yummy goodness, wipe down the top and put the lid on – we used this fancy little suction gripper to pull out the lids without having to touch them to keep them sterilized

- Sealed jars go back in the back in the boiling water for 10 min

- Pull ’em out, let ’em rest… and… wait for the tops to pop! As the remaining air cools down inside it will shrink and pop the top inward, showing that they have a solid seal and your product is protected! If you’ve made jam, it’ll set while it cools so don’t worry if it’s still runny when it comes out.


Comments
One Response to “You CAN Do It! – part I”Trackbacks
Check out what others are saying...[…] I finally did it. I cracked open one of the lovely jars from this adventure. I was hesitant to break into the jar of bread and butter pickles just by myself, so […]